
Intro
Implementing 3 tiers in Microsoft Entra Domain Services will greatly enhance the security posture of the domain, and minimize risk of hackers being able to traverse the domain.
This guide aims and making it as simple as possible to implement these hardening features.
However since Entra Domain Services is not like Active Directory, there are multiple challenges to overcome, in the pursuit of tiering. For more info, I refer to this great article: Don’t Use Entra DS to Replace Windows Active Directory – Ciraltos
The initial problem
When deploying Microsoft Entra Domain Services Instance and using a Global Administrator enabled account in Entra ID, this account becomes member of the “AAD DC Administrators” group. Even through this group does not directly correspond to “Domain Admins” or “Enterprise Admins” in a legacy Active Directory, this group grants enough permissions to do some real damage to member servers if compromised by hackers using lateral movement method.
No support for authentication policies?
In legacy Active Directory there is a feature called Authentication Policies within Active Directory Administrative Center. This feature is disabled in MEDS.
Therefore it is vital to have separate management virtual machines for each tier (Azure Bastion, VMs using JIT VM Access, or PAWs)
No support for LAPS?
In Legacy Active Directory there is support for LAPS. This is not the case in Microsoft Entra Domain Services.
LAPS is a great feature for keeping local administrator passwords unique and freshly changed.
I follow this Tech Community post and hope LAPS will soon be part of MEDS: Support Windows LAPS for Entra AD Domain Services | Microsoft Community Hub
Since LAPS is not supported in MEDS, it is recommended to enable GPO mentioned in later section, to remove all member users from local administrator group on each tier 1 and tier 2 servers. (Just ensure you have taken measures to regain access to servers data, e.g. from backups, if you for some reason end up not beeing able to manage servers with domain accounts)
How to manage
No support for Protected Users
In a legacy Active Directory we would use the Protected Users Group feature. However, this feature is not possible to benefit from in Entra Domain Services. The best way to overcome this in Azure is to use dedicated Azure Bastion hosts in each tier. This is described in the next section.
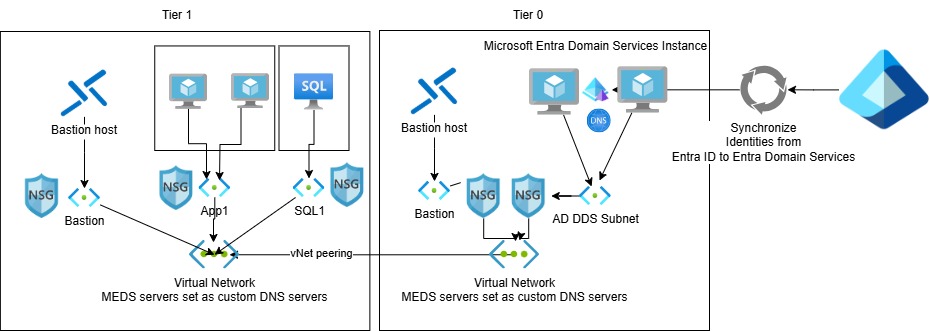
Azure Bastion for tier 0
Configuration for Azure Bastion is not covered in this article, but I have written another article about this topic: https://www.chkja.dk/2024/07/14/azure-bastion/
For tier 0 in Entra Domain Services, this is not the same as tier 0 in Active Directory.
We do not manage the domain controllers and also have no Entra Connect Sync server.
There are times where it is needed to manage parts of the domain, like then deploying this configuration, or then making changes to Group Policy Objects that are in use in the domain.
It is recommended to deploy 1 or more dedicated management servers in tier 0. This dedicated server can then be managed via Azure Bastion. It is very important to deploy the tier 0 management servers in a subnet that can reach the Entra Domain Services subnet in the vNet, but also NOT be able to reach any tier 1 or tier 2 servers/devices. This have to be locked down using Network Security Group (NSG) rules.
Azure Bastion for tier 1
Azure Bastion configuration is not covered in this guide. However it is recommended to use Azure Bastion for management of all tier 1 servers in Azure. This Azure Bastion should only be able to communicate with tier 1 servers. All other servers should be blocked using NSG rules.
Azure Bastion for tier 2
Azure Bastion configuration is not covered in this guide. However it is recommended to use Azure Bastion for management of all tier 2 servers in Azure. This Azure Bastion should only be able to communicate with tier 2 servers. All other servers should be blocked using NSG rules.
NSG rules should restrict traffic from tier 2 to tier 1 and tier 0. Managment ports like RDP 3389 should be blocked entirely, and other ports like 135 TCP (Kerberos) should be enabled only towards domain controllers.
Divide server into tiers
In tier 0 only management servers with AD DS tools should be present.
In tier 1, all member servers (SQL, IIS, Fileservers) should be present. Remember to create security groups for each member server in tier 1, and only assign admin users membership of required security groups for servers, to ensure no admin is granted admin access to a server that the admin should not have been granted access to.
In tier 2, legacy RDS session hosts should be present. AVD session hosts should also be in tier 2.
No client device should be joined to MEDS at all, therefore no mention of client devices are to be found in this article.
The reason why the next section talks about Remote Desktop Users, it not because we want to allow users to sign in to tier 1 VMs (that should always be prohibited). The reason is because you should not be using a user with local administrator permissions on target VMs for RDP connections. You use Remote Desktop Users with no other permissions to sign in to the target VM (via Azure Bastion or what other way you configure), and only once you are inside the target VM with your RDP session, you can elevate PowerShell, CMD, MMC e.g. with the tier 1 or tier 2 admin account you have that is granted admin permissions to the targer VM.
How to deploy Tiering Configuration
Run pre-reqs script
Copy the content of the script folder to a domain joined server in the domain that can reach the domain controllers (Manage Active Directory and Group Policy).
Files can be found here: (OBS – linked removed for company policy reasons, please reach out to me via LinkedIn to have the script sent to you)
Essentially the script only creates admins in each tier and some rds users for each tier as well. It also creates GPO for tier 1 and tier 2 to enforce local security groups management.
GPO
CAUTION
When linking Tier 1 and Tier 2 Local Admins GPOs, please note that these GPOs should be set to remove Domain Admins from builtin\administrators on all devices they are applied to.
Therefore it is recommended that you make your deployment user a member of the new Tier1Admins and Tier2Admins, so you will still have access after GPOs update and apply – alternatively you should use the newly created Tier 1/2 Admin users.
Tier 1
Link the imported GPO to the tier 1 Servers OU.
Tier 1 Administrators
Update the groups to match the groups of the domain you are deploying to.
In this example, checkmarks for “delete all member users” and “delete all member groups” are not checked.
This is a good way to start then testing towards servers. In the end, you should at least enable “delete all member groups.” If you also enable “delete all member users” and you have a local admin on each server, you need to include this localadmin in the “Add” list – otherwise this local user will be removed at next GPO update on the target servers. In MEDS it is recommended not to have any local users in the servers, since LAPS is not possible in MEDS.
Tier 1 RDP Users
Do the same for RDP Users: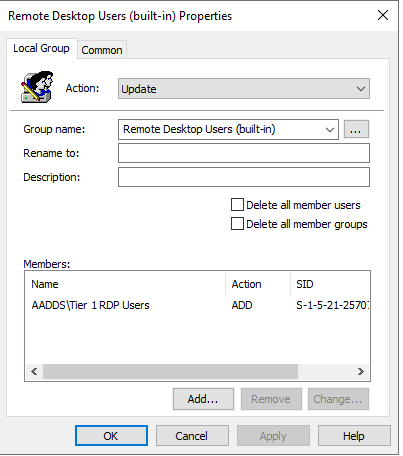
Tier 2
Link the imported GPO to the tier 2 Servers OU.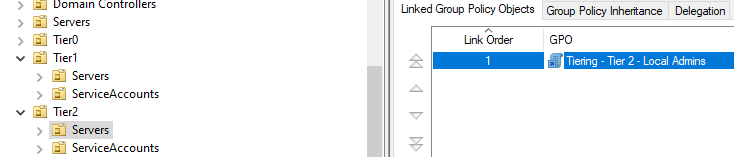
Tier 2 Device Admins
Update the groups to match the groups of the domain you are deploying to.
In this example, checkmarks for “delete all member users” and “delete all member groups” are not checked.
This is a good way to start then testing towards servers. In the end, you should at least enable “delete all member groups.” If you also enable “delete all member users” and you have a local admin on each server, you need to include this localadmin in the “Add” list – otherwise this local user will be removed at next GPO update on the target servers. In MEDS it is recommended not to have any local users in the servers, since LAPS is not possible in MEDS.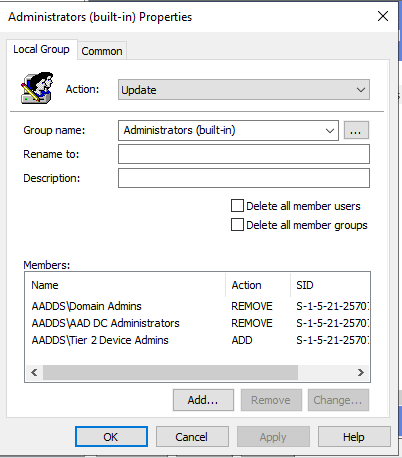
Tier 2 RDP Users
Create the same GPO for tier 2 Remote Desktop Users as for tier 1.
Comments