Microsoft Learn source article: https://learn.microsoft.com/en-us/entra/identity/role-based-access-control/security-emergency-access
This guide was originally written as an internal guide for infrastructure consultants to configure for customers. However I felt the need to share this approach, since break-glass is a concept widely debated, but very important to configure.
I do also recommend the use of a direct partner of Microsoft, that can setup a GDAP trust relationship between your tenant and there Microsoft Partner Center Cloud Solutions Provider Console (Microsoft PC CSP Console). That would enable a direct-partner to access your tenant with a delegated account in the event that your own users and break-glass accounts fails to give access in an emergency.
Important
You can mitigate the impact of accidental lack of administrative access by creating two or more emergency access accounts in your organization.
Important
To reduce the risk of an attack resulting from a compromised password, Microsoft Entra ID recommends that you require multifactor authentication for all individual users. This group includes administrators and all others (for example, financial officers) whose compromised account would have a significant impact.
However, at least one of your emergency access accounts shouldn’t have the same multifactor authentication mechanism as your other non-emergency accounts. This includes third-party multifactor authentication solutions. If you have a Conditional Access policy to require multifactor authentication for every administrator for Microsoft Entra ID and other connected software as a service (SaaS) apps, you should exclude emergency access accounts from this requirement, and configure a different mechanism instead. Additionally, you should make sure the accounts don’t have a per-user multifactor authentication policy.
Important
– Remember to document the emergency access accounts in a safe place (preferably on hard copy in a vault).
– Test these accounts every 90. days)
– If an admin leaves the company, you need to change the passwords for these accounts and document them again
Password requirements
Length: 65
Capital letters: Yes
Lowercase letters: Yes
Numbers: Yes
Special characters: Yes
Uniqe: Yes
Random generated: Yes
Should expire: No (guide for setting this is outlined in the creation of users)
Documentation requirements
All emergency access accounts must be documented.
Use the following table, that should be filled out and placed in a secure location. Do not store fracture 3 and fracture 3 approver in the same secure location.
| Name | UserName | Usage | Auth methods | IP Addresses | PIM Approver |
|---|---|---|---|---|---|
| Fracture 1 | meid_eaa1@CUSTOMERTENANTNAME.onmicrosoft.com | Use only if a conditional access policy have locked you out or if conditional access system is down | Per-user MFA enforced | N/A | N/A |
| Fracture 2 | meid_eaa2@CUSTOMERTENANTNAME.onmicrosoft.com | Use only if all MFA methods are unavailable does to breakdown. Can only be used from IP addresses documented here | Password, only from specific trusted locations | 85.191.204.67 | N/A |
| Fracture 3 | meid_eaa3@CUSTOMERTENANTNAME.onmicrosoft.com | Use only if all MFA methods are unavailable and conditional access policies are blocking you out. This account needs to elevate using PIM and another user must aprove this elevation first | Password. Must PIM Elevate before getting global admin role | N/A | meid_eaa3_app@CUSTOMERTENANTNAME.onmicrosoft.com |
| Fracture 3 Approver | meid_eaa3_app@CUSTOMERTENANTNAME.onmicrosoft.com | Use only if all MFA methods are unavailable and conditional access policies are blocking you out. This account is only used for PIM approval of fracture 3 account | Password | N/A | N/A |
- Usernames, passwords and OTPs must be stored in a secure matter. Microsoft recommends storing parts of the password in seperate vaults, that require at least two persons to construct the full password for an account. OTPs must be reachable for all admins (consider using a digital vault for OTPs, or an emergency smartphone)
Restrict access to Microsoft Entra admin center
It is important that users cannot access Entra Admin Center. Especially fracture 3 accounts that does not have MFA enforcement, they should not be able to browse the Entra ID and thereby finding information about other accounts that could be used for lateral movements.
- Sign in to Microsoft Entra admin center as a Global Administrator
- Click on Identity > Users > User settings
- Go to the setting Restrict access to Microsoft Entra admin center and set it to Yes
- Click Save
However it is recommended to also create a conditional access policy to block access to Entra Admin Center. - Credit to Ali Tajran for writing this great post: https://www.alitajran.com/restrict-access-to-microsoft-entra-admin-center/
- In later steps in this article, fracture accounts will be excluded for all conditional access policies, but it is important that fracture 3 approver account is NOT excluded from this conditional access policy.
Create Emergency Users
It is recommended to create 3 emergency access accounts. Account 3 and account 3 approver requires Entra ID P2 license.
Account 1
(will protect against conditional access policies malfunction)
The account will be protected with per-user MFA
- Sign in to the Microsoft Entra admin center as a Global Administrator.
- Browse to Identity, Users, All users.
- Select New user.
- Select Create user.
First Name: Fracture 1
User Name: meid_eaa1@CUSTOMERTENANTNAME.onmicrosoft.com (important to use .onmicrosoft.com and not customers domains)
Password (let me create password) create password using guidelines from this article
Roles: Global Administrator
Usage Location: Denmark
- Password should be set to not expire.
Open PowerShell 7.
Connect-MgGraph -Scopes "User.ReadWrite.All","Group.ReadWrite.All"

$User = Get-MGuser -UserId meid_eaa1@CUSTOMERTENANTNAME.onmicrosoft.com -Property UserPrincipalName, PasswordPolicies | Select-Object UserprincipalName,@{
    N="PasswordNeverExpires";E={$_.PasswordPolicies -contains "DisablePasswordExpiration"}
}

Update-MgUser -UserId $User.UserId -PasswordPolicies DisablePasswordExpiration
- Sign in to https://aka.ms/mfasetup with the newly created account in an in-private browser session.
- Enroll MFA methods. Use both Microsoft Authentication (or OTP to third-party), SMS, Phone and mail.
- Back to the page where you created the user in Entra ID. Navigate to the MFA portal: https://account.activedirectory.windowsazure.com/UserManagement/MultifactorVerification.aspx ?
- Find the newly created user and set MFA to be activated.
- Go to Entra ID, Protection, Conditional Access, Policies. Now Exclude this newly created users from all conditional access policies.
- Document the user, using guidelines from this article.
- Remember to test that the user is prompted for MFA.
Account 2
(will work if all MFA methods are unavailable)
The user will be protected using CA but not on specific location
- Sign in to the Microsoft Entra admin center as a Global Administrator.
- Browse to Identity, Users, All users.
- Select New user.
- Select Create user.
First Name: Fracture 2
User Name: meid_eaa2@CUSTOMERTENANTNAME.onmicrosoft.com (important to use .onmicrosoft.com and not customers domains)
Password (let me create password) create password using guidelines from this article
Roles: Global Administrator
Usage Location: Denmark
- Password should be set to not expire.
Open PowerShell 7.
Connect-MgGraph -Scopes "User.ReadWrite.All","Group.ReadWrite.All"

$User = Get-MGuser -UserId meid_eaa2@CUSTOMERTENANTNAME.onmicrosoft.com -Property UserPrincipalName, PasswordPolicies | Select-Object UserprincipalName,@{
    N="PasswordNeverExpires";E={$_.PasswordPolicies -contains "DisablePasswordExpiration"}
}

Update-MgUser -UserId $User.UserId -PasswordPolicies DisablePasswordExpiration
- Sign in to https://aka.ms/mfasetup with the newly created account in an in-private browser session.
- Enroll MFA methods. Use both Microsoft Authentication (or OTP to third-party) and SMS.
- Go to Entra ID, Protection, Conditional Access, Policies. Now Exclude this newly created user from all conditional access policies.
- Create a trusted location using the IP address for your current site. Create by going to Named locations, IP Ranges location and then create.
- Create a new conditional access policy called: Fracture 2 – Require MFA – Trusted Locations Exclusion
- Under Users, Include the newly created user
- Under All cloud Apps, select All Cloud Apps
- Under Network, Include all Networks. Exclude by choosing Selected Networks and locations, and then choose your trusted location.
- Under Grant, select “Require multifactor authentication.
- Set the policy to enable and then Create
- Document the user, using guidelines from this article.
- Remember to test that the user is not prompted for MFA then coming from the trusted IP, but prompted from other locations.
Account 3 + approver account
(will work if all MFA methods are unavailable and conditional access policies malfunction)
The user will be registrered for MFA but not enforced. This users global admin access will be controlled with Entra PIM (Privileged Identity Management).
- Sign in to the Microsoft Entra admin center as a Global Administrator.
- Browse to Identity, Users, All users.
- Select New user.
- Select Create user.
First Name: Fracture 3
User Name: meid_eaa3@CUSTOMERTENANTNAME.onmicrosoft.com (important to use .onmicrosoft.com and not customers domains)
Password (let me create password) create password using guidelines from this article
Roles: NONE
Usage Location: Denmark
- Password should be set to not expire.
- Create another user that will be PIM approver for Fracture 3 account.
First Name: Fracture 3 Approver
User Name: meid_eaa3_app@CUSTOMERTENANTNAME.onmicrosoft.com (important to use .onmicrosoft.com and not customers domains)
Password (let me create password) create password using guidelines from this article
Roles: NONE
Usage Location: Denmark - Password should be set to not expire for both accounts.
Open PowerShell 7.
Connect-MgGraph -Scopes "User.ReadWrite.All","Group.ReadWrite.All"

$User = Get-MGuser -UserId meid_eaa3@CUSTOMERTENANTNAME.onmicrosoft.com -Property UserPrincipalName, PasswordPolicies | Select-Object UserprincipalName,@{
    N="PasswordNeverExpires";E={$_.PasswordPolicies -contains "DisablePasswordExpiration"}
}

Update-MgUser -UserId $User.UserId -PasswordPolicies DisablePasswordExpiration

$User = Get-MGuser -UserId meid_eaa3_app@CUSTOMERTENANTNAME.onmicrosoft.com -Property UserPrincipalName, PasswordPolicies | Select-Object UserprincipalName,@{
    N="PasswordNeverExpires";E={$_.PasswordPolicies -contains "DisablePasswordExpiration"}
}

Update-MgUser -UserId $User.UserId -PasswordPolicies DisablePasswordExpiration
- Sign in to https://aka.ms/mfasetup with the newly created accounts in an in-private browser session.
- Enroll MFA methods. Use both Microsoft Authentication (or OTP to third-party) and SMS.
- Go to Entra ID, Protection, Conditional Access, Policies. Now Exclude this newly created users from all conditional access policies.
- Use PIM to setup “Fracture 3 Approver” account as Approver for Global Administrator Role. Configure “Fracture 3” account to be permanant eligible for global administrator role.
- Document the users, using guidelines from this article.
- Remember to test that the users is NOT prompted for MFA.
Alert rules / Monitoring
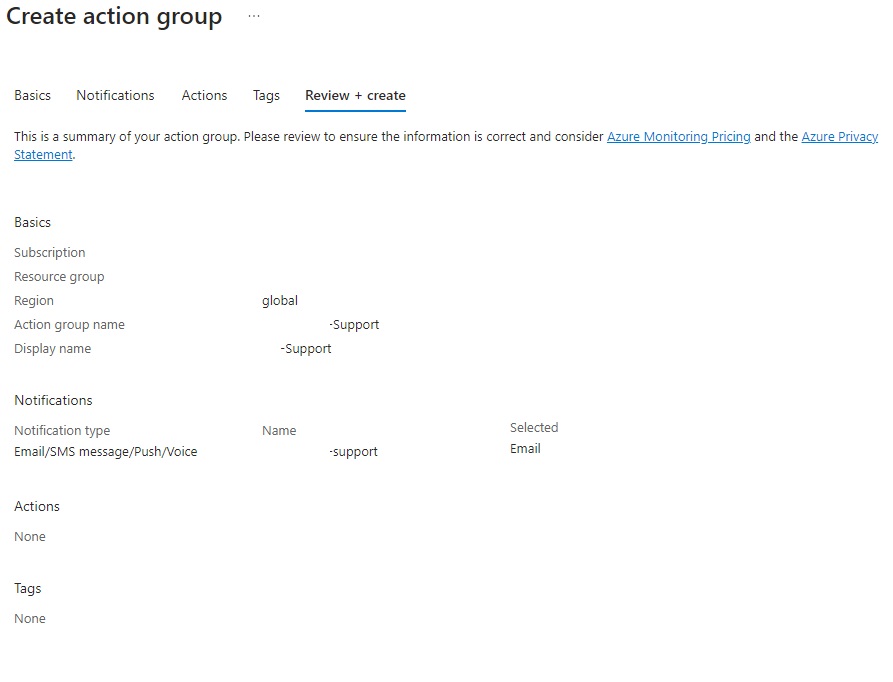
Create an action group
- Sign in to the Azure portal as at least a Monitoring Contributor.
- Search for Alert Rules
- Select Action Groups
- Select Create to create an action group
- Verify the subscription and resource group.
- Enter the action group name.
- Enter the action group display name.
- Under action type, select Email/SMS/Push/Voice.
- Enter an action name.
- Select the Action Type as Email/SMS/Push/Voice.
- Select Email and insert.
- Select Review+Create, then create the action group.

Obtain Object IDs of the break glass accounts
- Sign in to the Microsoft Entra admin center as at least a User Administrator.
- Browse to Identity > Users > All users.
- Search for the emergency access account and select the user’s name.
- Copy and save the Object ID attribute so that you can use it later.
- Repeat previous steps for second and third emergency access account.
Create an alert rule
- Sign in to the Azure portal as at least a Monitoring Contributor.
- Verify what log analytics workspace you are sending sign-in logs to by navigating to Entra ID, Monitoring & Health, Diagnostic settings (https://entra.microsoft.com/#view/Microsoft_AAD_IAM/DiagnosticSettingsMenuBlade/~/General ). Then verify the name of the log analytics workspace that you are sending sign-in logs to (or setup of not configured: https://learn.microsoft.com/en-us/entra/identity/role-based-access-control/security-emergency-access ).
- In the Azure Portal, search for Log Analytics workspaces and select the workspace you determined to hold the logs in previous step.
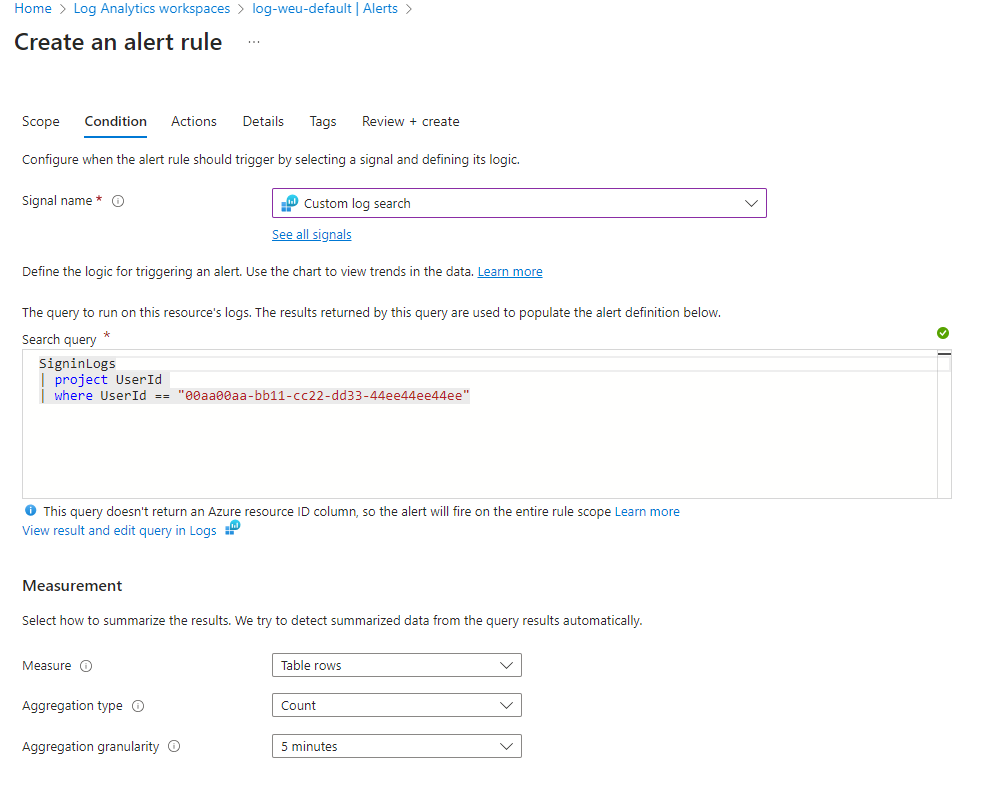
- In your workspace, select Create > New alert rule.
- Under Condition, select “Custom log search” under Signal name.
- Under Search query, enter the following query, inserting the object IDs of the three break glass accounts.
- Run the query to verify it works (remember to log in with one of the accounts before testing)
Note
For each additional break glass account you want to include, add another “or UserId == “ObjectGuid”” to the query.
Sample queries:
// Search for a single Object ID (UserID)
SigninLogs
| project UserId
| where UserId == "00aa00aa-bb11-cc22-dd33-44ee44ee44ee"
// Search for multiple Object IDs (UserIds)
SigninLogs
| project UserId
| where UserId == "00aa00aa-bb11-cc22-dd33-44ee44ee44ee" or UserId == "11bb11bb-cc22-dd33-ee44-55ff55ff55ff"
// Search for a single UserPrincipalName
SigninLogs
| project UserPrincipalName
| where UserPrincipalName == "user@yourdomain.onmicrosoft.com"

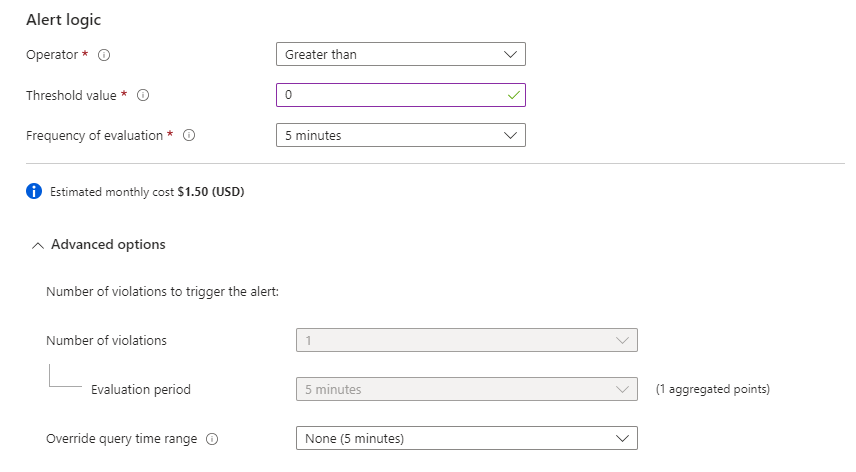
- Under Alert logic, enter the following:
- Operator: Greater than
- Threshold value: 0
- Frequency of evaluation: 5 minutes


- Under Actions
- Select Actions should be set to: Use Action Groups
- Select the action group you created earlier, to receive alerts
- Under Alert Details
- Specify the alert rule name: Monitor Emergency Access Accounts Usage
- Set the Severity level of the event to Critical(Sev 0).
- Under Enable rule upon creation, leave it set as yes.
- Click Create alert rule.
Maintenance requirements
90 day interval maintenance
- Change password for all accounts
- Validate users are working
- Update documentation
Event-driven maintenance
When there has been a recent change in IT staff, such as a job change, a departure, or a new hire.
- Change password for all accounts
- Validate users are working
- Update documentation

Comments