Deploy Azure Bastion to subscription
No hassle of managing Network Security Groups (NSGs)
You don’t need to apply any NSGs to the Azure Bastion subnet. Because Azure Bastion connects to your virtual machines over private IP, you can configure your NSGs to allow RDP/SSH from Azure Bastion only. This removes the hassle of managing NSGs each time you need to securely connect to your virtual machines. For more information about NSGs, see Network Security Groups.
Support vNet peering
Azure Bastion supports vNet peering (All SKUs except Developer). Bastion can connect to VMs in all peered vNets. Therefore you can minimize the number of bastion instanced deployed to your setup.
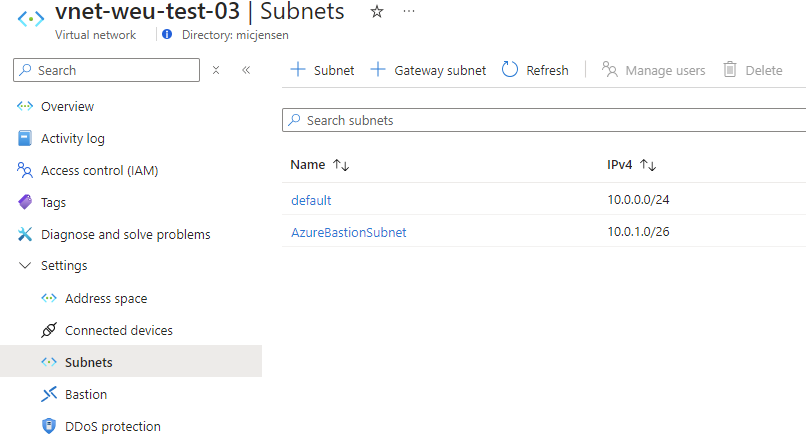
Before you begin, the vNet that the Bastion host(s) will be deployed to, must have a suitable subnet. The recommended configuration is to create a /26 subnet in the vNet.

- Go to the vNet there you want to deploy your bastion.
- Find Bastion.

- Select Configure Manually.

- Configure your bastion setup as needed. In this demo I configure the following:
- Deploy to a certain Resource Group
- I give the instance a name
- Choose Region
- Choose Tier
- Attach to vNet and subnet
- Choose to create public IP and rewrite the proposed name to suit my naming convention

SKU overview:
https://learn.microsoft.com/da-dk/azure/bastion/bastion-overview#sku
Instance overview:
https://learn.microsoft.com/da-dk/azure/bastion/configuration-settings#instance
Important
Each instance can support 20 concurrent RDP connections and 40 concurrent SSH connections for medium workloads (see Azure subscription limits and quotas for more information). The number of connections per instances depends on what actions you’re taking when connected to the client VM. For example, if you’re doing something data intensive, it creates a larger load for the instance to process. Once the concurrent sessions are exceeded, another scale unit (instance) is required.
Instances are created in the AzureBastionSubnet. To allow for host scaling, the AzureBastionSubnet should be /26 or larger. Using a smaller subnet limits the number of instances you can create. For more information about the AzureBastionSubnet, see the subnets section in this article.
- Select Next: Advanced.

- Select Next (leave everything default on the advanced page).

- Select Create.
Connect to VM via Bastion
- Find the VM you want to connect to.
- Hit Connect, and then “Connect via Bastion”

- Input username/password for the VM and then connect.

- If pop-up is blocking the new window, you must allow the window to open.
- Now you are connected to the VM in a secure way!
Native Client connections
https://learn.microsoft.com/en-us/azure/bastion/connect-vm-native-client-windows
Enable feature
Before you can use the Native Client, you must enable the feature on the bastion instance. You only need to do this once.
- Search for Bastion, and select the bastion instance you want to enable the feature on. (if you are not sure what instance to configure, revert by selecting the vNet your servers are running in (OBS: if using peering, this approach can also be tricky to use), and from the vNet, select the bastion instance)
- Go to Configuration on the bastion instance, and then enable Native Client Support.

- Hit Apply.
Secure your native client connection
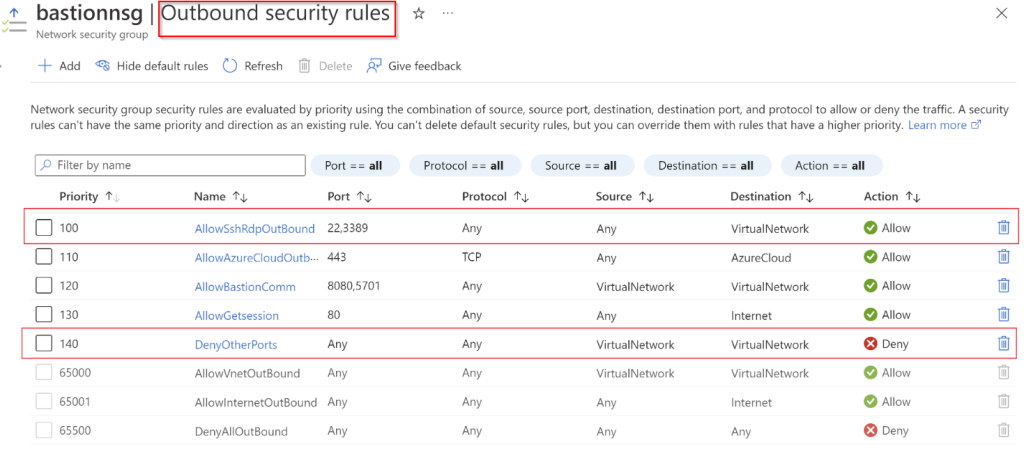
You can limit port access by only providing access to port 22/3389 outbound from Bastion hosts. To restrict port access, you must deploy the following NSG rules on your AzureBastionSubnet to allow access to select ports and deny access from any other ports. Do that by creating a new NSG, define outbound rules as shown in the image, and attach that NSG to the subnet there you deployed Azure Bastion instance.

RDP to a Windows VM
When a user connects to a Windows VM via RDP, they must have rights on the target VM. If the user isn’t a local administrator, add the user to the Remote Desktop Users group on the target VM.
The VM’s Resource ID.
The Resource ID can be easily located in the Azure portal. Go to the Overview page for your VM and select the JSON View link to open the Resource JSON. Copy the Resource ID at the top of the page to your clipboard to use later when connecting to your VM.
- Sign in to your Azure account using az login. If you have more than one subscription, you can view them using az account list and select the subscription containing your Bastion resource using az account set –subscription “<subscription ID>”.
- To connect via RDP, use the following example. (AZ CLI)
az network bastion rdp --name "<BastionName>" --resource-group "<ResourceGroupName>" --target-resource-id "<VMResourceId>"
- After running the command, you’re prompted to input your credentials. You can use either a local username and password, or your Microsoft Entra credentials. Once you sign in to your target VM, the native client on your computer opens up with your VM session via MSTSC.
Important
Remote connection to VMs that are joined to Microsoft Entra ID is allowed only from Windows 10 or later PCs that are Microsoft Entra registered (starting with Windows 10 20H1), Microsoft Entra joined, or Microsoft Entra hybrid joined to the same directory as the VM.
Network Security Groups hardening
In order for Azure Bastion to have the best usage and the virtual machines are protected, it is recommended to block all other attempts to manage servers outside of Bastion.
- Create NSG (Network Security Group)
- Attach NSG to subnet there virtual machines are running (NOT Bastion subnet)

- Create 3 inbound rules as shown in below image. Note that source on the first rule is the subnet there bastion instance are running.

- Verify that you can access servers via Bastion, but not directly from other servers in same vNet/subnets, other vNets if peering is used and client VPN.

Comments